Adding a Relay Server
To add an (SMTP) relay server to GreenArrow Engine’s configuration, complete the following steps:
- Obtain authorization to relay messages from your GreenArrow Engine server to the relay server. This usually involves obtaining a username and password (SMTP AUTH), or authorizing one of GreenArrow Engine’s IP addresses as a relay client. The SMTP AUTH and POP3 Email Users page describes how to create a new SMTP AUTH account on a GreenArrow Engine installation.
- Log into the GreenArrow Engine Web Interface.
- Navigate to
Configure=>Virtual MTAs:
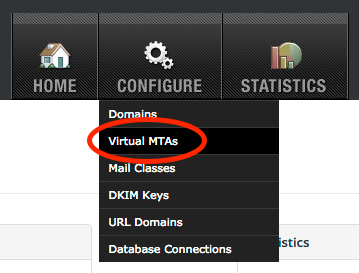
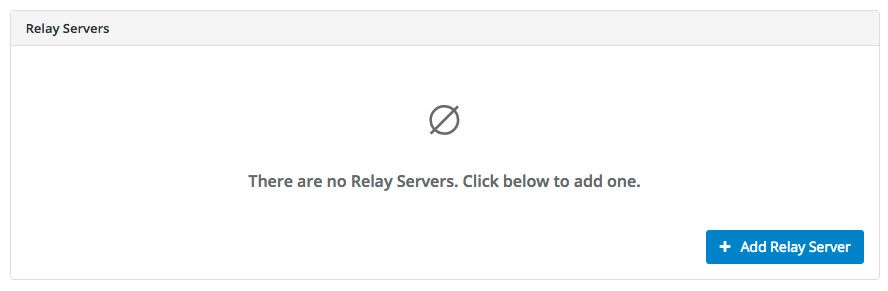
- Click the
Add Relay Serverbutton:
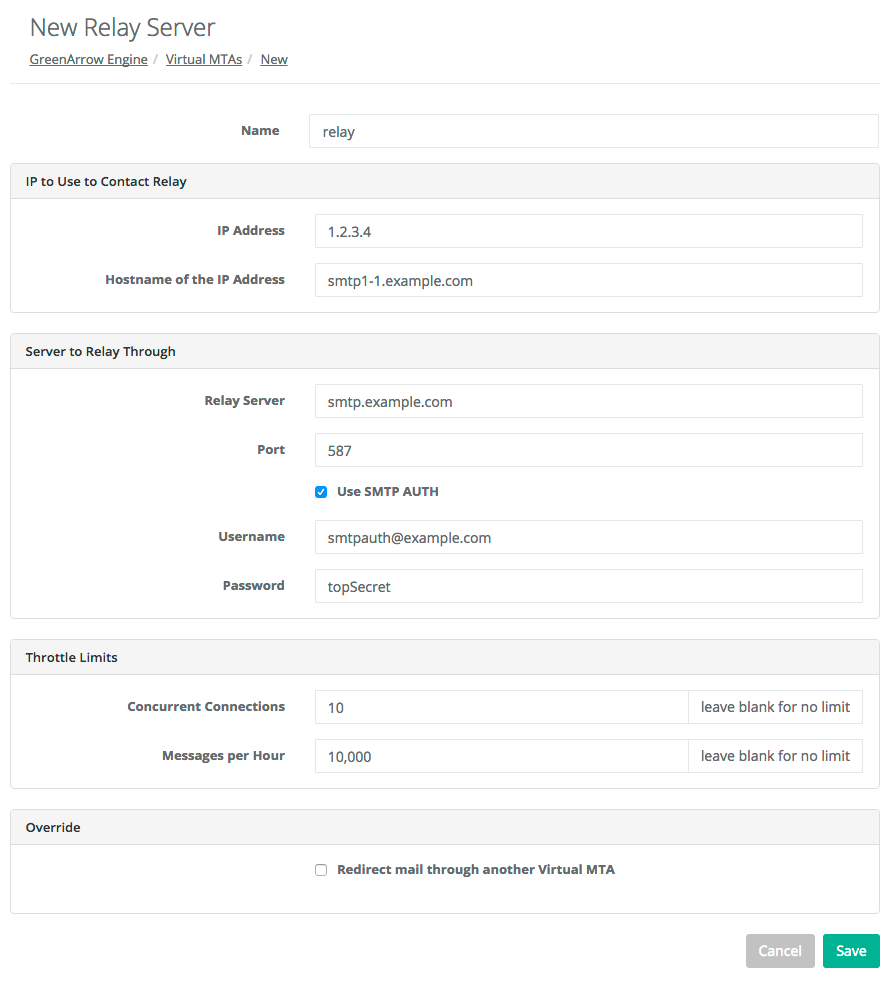
- In the
New Relay Serverform, complete the following fields, then clickSubmit:-
Name- The name, or MTAid that you wish to assign this new VirtualMTA.- Must contain only ASCII characters in the range
0x20-0x7e; excluding comma, pound, and at-sign. - Must not have leading nor trailing whitespace.
- Must be unique (case-insensitive) across all types of VirtualMTAs (IP Addresses, Relay Servers, and Routing Rules).
- Must not also be an integer.
- Must be from 1 to 200 characters in length.
- Must contain only ASCII characters in the range
-
IP Address- the IP address to use to connect to the relay server. If you’re using NAT, the IP address to enter is the private IP address, since this is what was assigned to your Linux installation’s networking configuration. -
Hostname of the IP Address- the reverse DNS record for the IP address that’s being used to connect to the relay server. -
Relay Server- the fully qualified domain name, or IP address of the relay server to connect to. When possible, we recommend using a full qualified domain name which the relay server will retain if it’s migrated to a different IP address at a future date. -
Port- the TCP port to connect to. This is usually port587or25. -
Use SMTP AUTH- check this box if a username and password is required to log into the relay server. -
Username- the username to log into the relay server with, if applicable. This field is hidden unless theUse SMTP AUTHbox is checked. -
Password- the password to log into the relay server with, if applicable. This field is hidden unless theUse SMTP AUTHbox is checked. -
Concurrent Connections- the maximum number of concurrent SMTP connections to make to the relay server. -
Messages per Hour- the maximum number of messages per hour to send to the relay server. -
Redirect mail through another VirtualMTA- unchecked, unless you’d like to redirect mail through another VirtualMTA.
-
-
Send a test message using the new Relay Server VirtualMTA. This is ideally done from the application that you normally use to send messages through GreenArrow so that the testing is end-to-end. If you’d like to perform a test on the command line, the following command can be run, replacing
relaywith the name of the new VirtualMTA, and[email protected]with your email address:date | GREENARROW_MTAID=relay /var/hvmail/bin/mailsubj "New VirtualMTA Test - relay" [email protected] -
Verify that you receive the test message, and examine the messages headers to verify that the correct IP address and
HELOvalue were used to send the message. This data can be found in one of theReceivedheaders. For example:Received: from smtp1-1.example.com (1.2.3.4)