Installation Guide
- Table of Contents
- Intro
- Select a GreenArrow persistence mode
- Prerequisites
- Install GreenArrow
-
Further GreenArrow Engine and Operating System Configuration
- Performance Tuning (Strongly Recommended)
- Configure HTTPS (Strongly Recommended)
- Configure GreenArrow Engine Time Zone (Optional)
- Server name (Required)
- Login URLs (Required)
- Disable Studio services (Required for Engine-only customers)
- Incoming email configuration (Required)
- Configure DKIM Signing for Outbound Mail (Required)
- IP addresses for sending (Required)
- Create URL Domain(s) (Required)
- Configure SimpleMH (Required)
- Sendmail symlinks (Optional)
- Grant SSH access to GreenArrow (Optional)
- GreenArrow Monitor integration (Optional)
- Configure GreenArrow to Start at Boot Time (Strongly Recommended)
- Final Testing
Intro
This document describes how to install and configure GreenArrow. It’s written for experienced Linux systems administrators. Please contact GreenArrow technical support if you encounter any issues with these instructions or if you would rather have GreenArrow perform your installation.
Select a GreenArrow persistence mode
GreenArrow can store its persistent data a few different ways.
Traditional Mode
In Traditional mode, GreenArrow will store its persisted data in a variety of
paths under the /var/hvmail directory structure.
Persistence Path Mode
In Persistence Path mode, GreenArrow will store its persisted data at a
directory of your choosing. In this mode, GreenArrow will symlink the persisted
paths under /var/hvmail to your specified path.
See this document about Persistence Path Mode for more information.
Docker Mode
GreenArrow can run under Docker. Please see this document for more information on running and managing GreenArrow under Docker.
This installation guide is a good reference if you’ll be using Docker to help you understand how various parts of GreenArrow fit together, but following this guide is not required to get GreenArrow running inside of Docker.
When using Docker, individual Docker containers can be considered disposable. Your persistent data is stored on a Docker volume whose name you’ll provide during initialization and startup.
Prerequisites
Provision a server
We recommend running GreenArrow on a dedicated server or VM. GreenArrow can co-exist with other applications, but that may introduce conflicts not addressed by this document.
The Supported Linux Distributions document lists your Linux distribution options.
For the sake of brevity, our documentation refers to Red Hat Enterprise Linux, AlmaLinux, Rocky Linux, and Amazon Linux collectively as “RHEL” and refers to Ubuntu Linux and Debian Linux collectively as “Debian”.
As an example, the phrase “on RHEL systems” in our documentation means “on systems running Red Hat Enterprise Linux, AlmaLinux, Rocky Linux, or Amazon Linux as the operating system”. Similarly, the phrase “on Debian systems” in our documentation means “on systems running Debian Linux or Ubuntu Linux as the operating system”.
If you’re running GreenArrow with less than 4GB of RAM, it will require tuning outside the scope of this document. Please contact GreenArrow technical support if you’re in this situation.
Our Hardware Requirements document contains server sizing details.
Partitioning Guidelines
For servers dedicated to GreenArrow, we recommend the following:
-
Create a single 20GB
/partition during the Linux installation process, and leave the remaining disk space unpartitioned. We’ll discuss how to partition and format the remaining space later in this document.NOTE: if you or your hosting provider use RAID arrays, then please still put the disks in your desired RAID configuration, but leave the space outside of the root partition unpartitioned.
-
If the server uses a combination of SSD and non-SSD disks, then we recommend creating the
/partition on non-SSD disks, so that all available SSD disk space can be dedicated to GreenArrow.
Log in as the root user using the bash shell
Install prerequisite packages
On RHEL systems, we recommend selecting the “Base” package group only during the installation. If you didn’t include that package group during the installation or aren’t sure if it was included, you can install it later with:
yum -y groupinstall base
You will also require a working installation of ruby in order to install our software:
yum -y install ruby
On Debian systems, we recommend installing the OpenSSH server and otherwise performing a minimal installation. After your operating system installation is complete, you can install the remaining prerequisites with:
apt-get -y install curl apt-transport-https gnupg ruby
Additional repositories needed by specific distributions
Certain Linux distributions require additional repositories in order to install GreenArrow. See the table below to find the command needed to install the required repositories, if any.
|
AlmaLinux 8
EPEL and PowerTools |
|
|
AlmaLinux 9 and Rocky Linux 9
EPEL and CRB |
|
|
AlmaLinux 10 and Rocky Linux 10
EPEL and CRB |
|
|
Red Hat Enterprise Linux 8
EPEL and CRB |
|
|
Red Hat Enterprise Linux 9
EPEL and CRB |
|
|
Red Hat Enterprise Linux 10
EPEL and CRB |
|
|
Amazon Linux 2
EPEL |
Configure SELinux
GreenArrow requires that SELinux be disabled or in permissive mode.
To verify the current SELinux status and mode run:
sestatus
When SELinux is enabled, the output will look like this:
[root@host ~]# sestatus
SELinux status:                 enabled
SELinuxfs mount:                /sys/fs/selinux
SELinux root directory:         /etc/selinux
Loaded policy name:             targeted
Current mode:                   enforcing
...
sed -i 's/SELINUX=enforcing/SELINUX=disabled/' /etc/selinux/config
sed -i 's/SELINUX=permissive/SELINUX=disabled/' /etc/selinux/config
On Amazon Linux 2023 and RedHat Enterprise Linux 9 run the following command (requires the grubby package):
grubby --update-kernel ALL --args selinux=0
Reboot the server to apply changes to SELinux:
reboot
GreenArrow can run in SELinux permissive mode, but that causes additional overhead as SELinux policies are evaluated and violations logged.
If you’d like more details on this topic, then see RedHat’s SELinux documentation.
Configure time synchronization
GreenArrow depends on a stable, accurate system clock. On all supported Linux distributions, the GreenArrow package depends on time-sync.target, a systemd unit that signals when the system clock has been synchronized with a remote NTP server.
You need to install a reliable time synchronization service and ensure it starts automatically on reboot.
Follow the instructions in this document to install, verify, and troubleshoot time synchronization.
Once configured, verify that time synchronization is working by running the following commands:
date "+%Y-%m-%d %H:%M:%S.%6N%:z"
hwclock
Both commands should print times that are (a) within a second of each other, and (b) accurate relative to a known-good time source such as time.gov.
Configure filesystems
We recommend that your filesystems hosting GreenArrow data (particularly the message queue) be configured in the following ways for best performance:
- Use an XFS or Ext4 filesystem
- Use a block size of 4096 bytes
- Allocate one inode for every block
Here’s an example of creating an XFS filesystem that meets the above criteria. The inode recommendation is met by mkfs.xfs’s default values:
mkfs.xfs -b size=4096 -L /media/disk1 /dev/sdb1
Here’s an example of creating an Ext4 filesystem that meets the above criteria:
mkfs -t ext4 -j -b 4096 -i 4096 -L /media/disk1 /dev/sdb1
Configure symlinks
This only applies to Traditional Mode GreenArrow installations. If you’re using Persistence Path Mode, skip this step.
GreenArrow will install into /var/hvmail. If /var is not on the correct partition for installation, then you should create symlinks out to the directory where you’d like data to be stored. You can also place different parts of GreenArrow on different disks if you’d like to split the load between them. Here are the directories that are safe to put on their own disks:
| Directory | Contents |
|---|---|
/var/hvmail |
All of GreenArrow’s data |
/var/hvmail/qmail-disk/queue |
GreenArrow’s message queue |
/var/hvmail/postgres |
GreenArrow’s internal PostgreSQL database |
/var/hvmail/log |
GreenArrow’s log files and searchable databases of log data |
For example, to create a symlink to relocate /var/hvmail to /media/disk1/hvmail run the following:
mkdir -p /media/disk1/hvmail
ln -s /media/disk1/hvmail /var/hvmail
This should be done before GreenArrow is installed.
Free up ports for GreenArrow
There are a number of ports that GreenArrow will bind to for network services. We recommend ensuring that these ports are free prior to installing GreenArrow.
TCP port 25 on all IP addresses – SMTP
By default, GreenArrow will want to listen on port 25 for incoming connections on all IPs. Most Linux systems ship with a default MTA of Postfix or Sendmail also listening on port 25.
We recommend you do one of the following:
-
Disable the existing MTA
If another MTA is already installed, it’s usually Sendmail, Exim or Postfix. The following command will check whether any of these are running:
ps axf | grep -P 'sendmail|exim|postfix' | grep -v grepWe recommend against uninstalling the other MTA since a subsequent package update could reinstall that MTA, and configure it to automatically start and listen on port 25. Instead, we recommend configuring the MTA not to start.
Here’s an example of how to do this with the copy of Postfix that’s often installed by default on RHEL systems:
service postfix stop && chkconfig postfix offHere’s an example of how to do this with an Exim installation running on Debian systems:
service exim4 stop && update-rc.d exim4 disable -
Configure the existing MTA to listen on a port other than 25
This will allow the existing MTA to continue to send mail, but allow GreenArrow to receive email.
-
Configure GreenArrow to bind to a port/IP that does not conflict with the existing MTA
It’s possible to have the existing MTA listening on port 25 on one IP and GreenArrow listen on port 25 on another IP. If you configure GreenArrow not to listen on port 25, then it will not be able to receive incoming emails, including bounces and spam complaints from the Internet. The port/IP GreenArrow binds its SMTP service to can be configured by updating the
/var/hvmail/control/smtp.ipaddrand/var/hvmail/control/smtp.portfiles.
TCP port 587 on all IP addresses – SMTP submission
By default, GreenArrow will listen on TCP port 587 on all IP addresses.
If a service conflicts with this port, it’s usually another MTA such as Postfix.
Instruction on how to change GreenArrow’s default SMTP submission port can be found here.
TCP port 110 on all IP addresses – POP3
By default, GreenArrow will listen on TCP port 110 on all IP addresses.
Instruction on how to change GreenArrow’s default POP3 port can be found here.
TCP ports 80 and 443 on all IP addresses – HTTP and HTTPS
By default, GreenArrow will listen on TCP ports 80 and 443 on all IP addresses.
Instruction on how to change GreenArrow’s default HTTP and HTTPS ports can be found here.
We recommend being careful about changing these ports because click and open tracking links which use non-default ports can trigger spam filters.
Make firewall openings
The Firewall Configuration page describes GreenArrow’s requirements for incoming and outgoing connections.
If you’re restoring from backups, stop here, and return to the document that you sent you here.
Install GreenArrow
The following steps install GreenArrow.
The following two sections describe how to install the current version of GreenArrow or a previous version.
You should only perform the actions in one of the two sections, not both.
Install the Current GreenArrow packages (Default)
You will need your GreenArrow repository access key, which is a 16-character hexadecimal number. This is provided with your license.
Run this command on any Supported Linux Distribution,
substituting your repository access key for the 0000000000000000 shown here:
ruby -e "$(curl -fsSL http://git.drh.net/pub/install_greenarrow_packages)" \
  -- --repokey=0000000000000000
The above command will create either YUM/DNF or APT repositories on your system, depending on whether you’re running on an RHEL system or a Debian system. It then installs the latest version of GreenArrow using the appropriate installation tool.
Install Older GreenArrow packages (Optional)
The previous section will download and install packages for the current version of GreenArrow software.
If for some reason you wish to install an older version of GreenArrow software instead, you can specify that version like so:
ruby -e "$(curl -fsSL http://git.drh.net/pub/install_greenarrow_packages)" \
  -- --repokey=0000000000000000 --greenarrow-version=X.YYY.z
For example, if you wish to install version 4.356.1 of GreenArrow instead of the current version, you would run the
command, again substituting your repository access key for the 0000000000000000 shown here:
ruby -e "$(curl -fsSL http://git.drh.net/pub/install_greenarrow_packages)" \
  -- --repokey=0000000000000000 --greenarrow-version=4.356.1
If you go this route, you should also switch to the corresponding version of the documenation after running the above command, using the pull-down menu in the left sidebar, and pick up at the “Update environment settings” section:
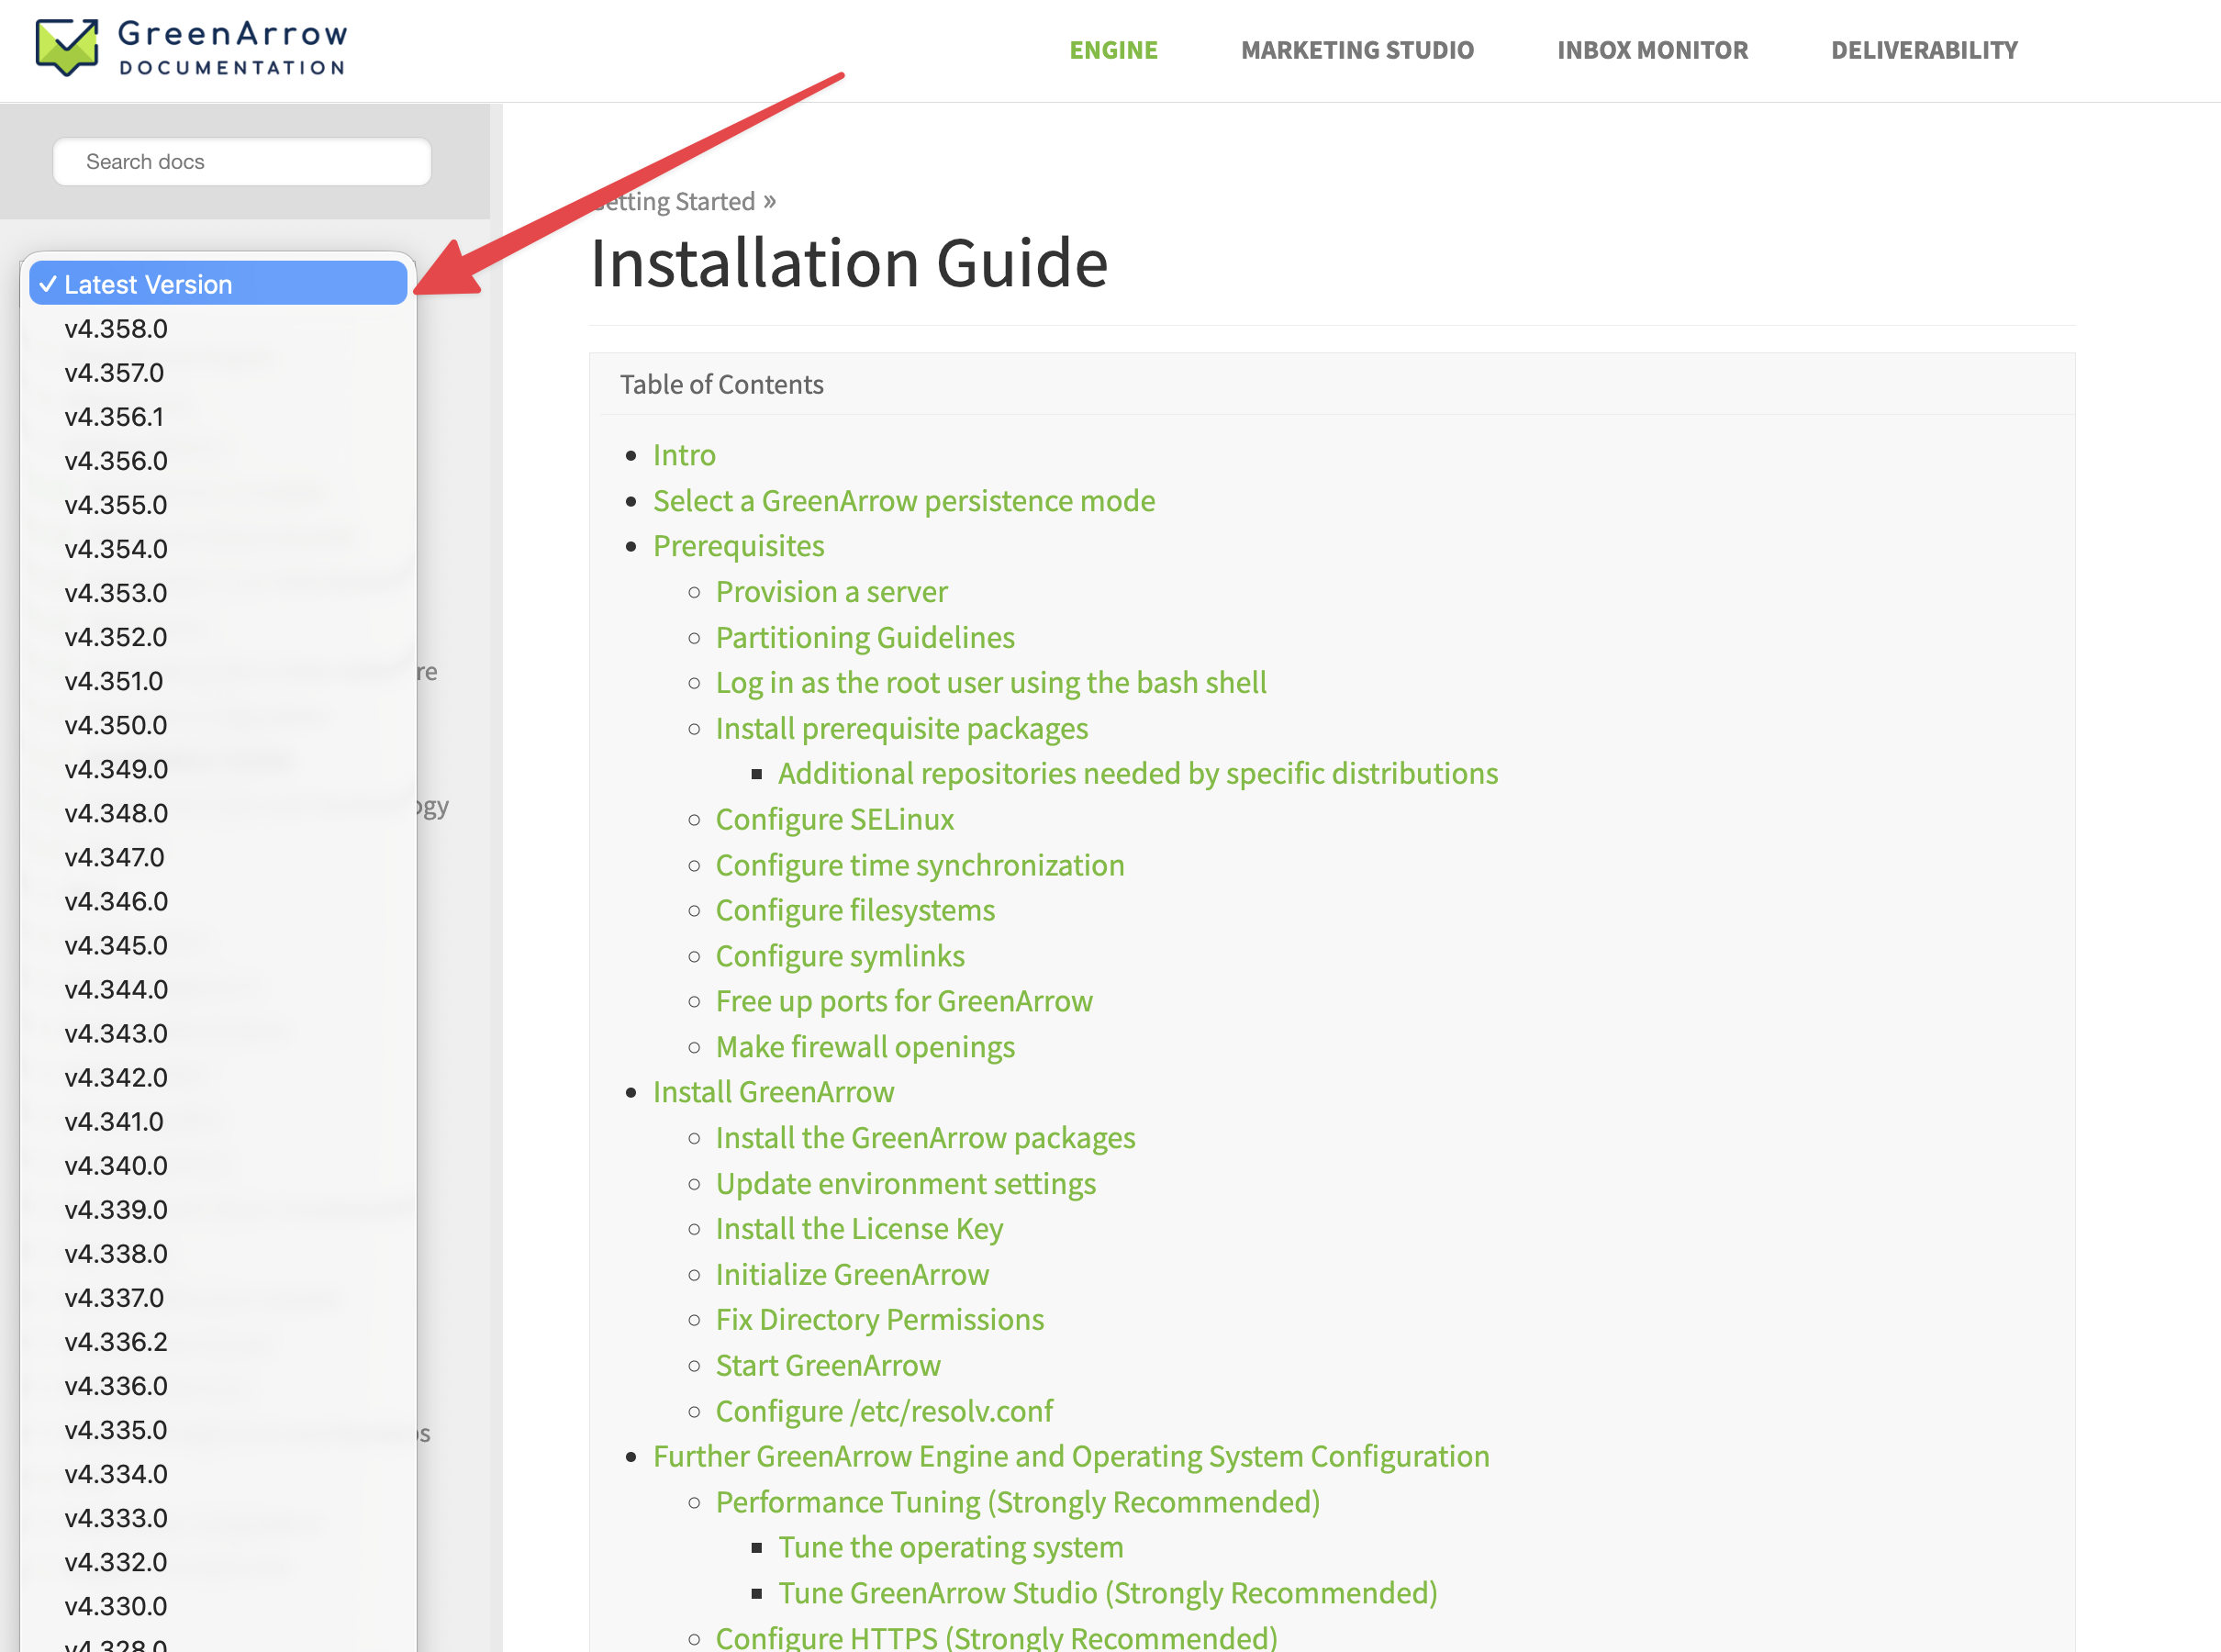
The reason for the documentation switch is that some commands that are run during the installation have changed over time, so it’s important that you run the installation instructions for the version you’re installing.
Update environment settings
GreenArrow packages make a number of changes to environment settings. To activate the changes, either log out, then back into the server, or run the following commands. If you’re logged into the server in multiple windows, then you’ll need to complete this step in each window:
. /etc/profile.d/greenarrow-engine.sh
. /etc/profile.d/greenarrow-ruby.sh
. /etc/profile.d/greenarrow-studio.sh
. /etc/profile.d/greenarrow-passenger.sh
If you’re performing a migration, stop here, and return to the document that you sent you here.
Install the License Key
Save the license key that was provided by GreenArrow to the /var/hvmail/control/license_key file.
Initialize GreenArrow
For the next step, you’ll run the greenarrow init command. GreenArrow must be
stopped (or not yet started) before running this command. This command accepts
the following arguments:
|
--persistence-path=
string |
If you want to run in Persistence Path Mode, add this parameter. Its argument is the path you want to use for GreenArrow’s persisted data. This path must already exist. |
|
--admin-email=
string |
The email address for the new Engine and Studio administrator accounts that will be created as part of initialization. |
|
--admin-password=
string |
The raw password to use for the Engine and Studio administrator accounts that will be
created as part of initialization. May not be specified with |
|
--admin-password-prompt
bool |
Prompt for the raw password to use for the Engine and Studio administrator accounts.
This helps to avoid putting your admin password into your shell history.
May not be specified with |
|
--admin-password-hash=
string |
An encoded password to use for the Engine and Studio administrator accounts that will be
created as part of initialization. This hash is generated using the |
|
--attach
bool |
Specify this argument if you want to attach a new installation of GreenArrow to an existing (already initialized) persistence path. When using
|
|
--attach-with-version-mismatch
bool |
Allow GreenArrow to attach to to a previously initialized persistence path which was attached to
a different version of GreenArrow. Must be used in conjunction with the |
Persistence Path Mode
If you want to run in Persistence Path Mode, run the following to initialize GreenArrow with a new persistence path:
greenarrow init \
  --persistence-path=/Volumes/Your-GreenArrow-Path \
  --admin-email="[email protected]" \
  --admin-password="password1234"
Replace /Volumes/Your-GreenArrow-Path with the path you’ve created to use for GreenArrow’s
persistent storage. The path you provide must already exist and must be an empty directory.
Replace [email protected] and password1234 above with
the email address / password you’d like to use for your initial GreenArrow
administrator account.
Traditional Mode
Otherwise, if you’ve elected to run in Traditional Mode, run the following to initialize GreenArrow:
greenarrow init --admin-email="[email protected]" --admin-password-prompt
Replace [email protected] above with the email address you’d like to use
for your initial GreenArrow administrator account.
Your initial administrator account
Be sure to record the login information so that you can use it later.
- If you wish to change Engine’s password or create additional Engine accounts, those procedures are documented here.
- If you wish to change Studio’s password or create additional Studio accounts,
either can be done within the
ADMINtab of Studio’s web interface. - Engine and Studio have some shared components, so even if you don’t have a Studio license, you’ll still have Studio installed. You just won’t be able to use Studio without a Studio license key.
Fix Directory Permissions
Run this command:
/var/hvmail/studio/script/fix-permissions
Start GreenArrow
Run this command:
systemctl start greenarrow.service
Configure /etc/resolv.conf
-
Configure the
/etc/resolv.conffile to query one or more recursive DNS resolvers. For example, if you would like to query the Google and Cloudflare public DNS servers, you could populate the file with:echo "nameserver 8.8.8.8 nameserver 8.8.4.4 nameserver 1.1.1.1" > /etc/resolv.conf -
Verify that different nameservers aren’t configured elsewhere:
-
On RHEL systems:
find /etc/sysconfig/network-scripts/ifcfg-* /etc/sysconfig/network -type f | xargs grep 'DNS=' | grep -v 'PEERDNS=' -
On Debian systems:
grep dns-nameservers /etc/network/interfaces
-
Further GreenArrow Engine and Operating System Configuration
The following sections describe various configuration settings, with the heading of each section describing if the setting is Required, Strongly Recommended, or just Optional.
Performance Tuning (Strongly Recommended)
Tune the operating system
-
Mount each filesystem that GreenArrow is using with the
noatimeoption. For example, the options in/etc/fstabmight look like:defaults,noatime/etc/fstabupdates can be applied with themountcommand. For example, to apply changes to the/filesystem, run:mount -o remount / -
Disable disk quotas on each filesystem that GreenArrow is using. This is typically the default configuration on a new Linux installation.
-
Add
/var/hvmail, as well as any additional filesystem paths that GreenArrow is using to the list of paths to exclude fromlocate’s database by updating thePRUNEPATHSvariable in the/etc/updatedb.conffile. -
Review your
net.core.somaxconnsysctl setting (by runningsysctl net.core.somaxconn).- This value should meet or exceed the greatest of the following calculations:
- 4096 (This is the default as of Linux 5.4)
- Total desired SMTP concurrency + 100
- You can run
greenarrow config recommend_sysctlto print recommended settings for your configured SMTP concurrency. - You can obtain your desired SMTP concurrency by summing the following:
- The value in
/var/hvmail/control/smtp.concurrency - The
CONCURRENCYvalue in/var/hvmail/control/smtp2 - The
CONCURRENCYvalue in/var/hvmail/control/smtp3
- The value in
-
greenarrow config reloadandgreenarrow config validatewill warn you if yournet.core.somaxconnsetting is insufficient for the configured SMTP concurrency. - One method for setting
net.core.somaxconn(to 6144 in this example) is as follows:echo "net.core.somaxconn = 6144" >> /etc/sysctl.conf sysctl -p
- This value should meet or exceed the greatest of the following calculations:
-
Set
vm.overcommit_memoryto1andvm.overcommit_ratioto at least400.-
These settings prevent GreenArrow from being incorrectly killed by the Linux out-of-memory killer.
-
Here’s one way you can apply these settings to your system:
cat >> /etc/sysctl.d/50-greenarrow.conf <<EOF
vm.overcommit_memory = 1
vm.overcommit_ratio = 400
EOF
sysctl -p /etc/sysctl.d/50-greenarrow.conf
-
Tune GreenArrow Studio (Strongly Recommended)
PostgreSQL
The default GreenArrow PostgreSQL configuration is usually optimal in two situations:
- You’re running GreenArrow Engine, but not GreenArrow Studio.
- You have at least 4GB, but less than 6GB of RAM.
If either of the above describe your server, then you can skip the rest of this PostgreSQL tuning section. Otherwise, read on.
If your server has less than 4GB of RAM, then PostgreSQL’s default settings may be too aggressive. Please contact GreenArrow technical support if you’re in that situation.
For all other servers (servers that are running GreenArrow Studio and have at least 6GB of RAM), we recommend tuning the following PostgreSQL settings, based on the amount of RAM available to GreenArrow. If there are any non-GreenArrow applications running on your server, then you should subtract their estimated maximum memory usage from your server’s configuration before performing the calculations. For example, if your server has 8GB of RAM, and there’s a MySQL server running on it which will use a maximum of 2GB of RAM, then you should perform the calculations in this section as if the server has 6GB of total RAM.
The four settings to adjust are:
| Name | Recommend value |
|---|---|
shared_buffers |
25% of total RAM |
effective_cache_size |
50% of total RAM |
work_mem |
1% of total RAM |
maintenance_work_mem |
2% of total RAM |
These values can be set by editing the /var/hvmail/control/postgres.conf file.
Here’s an example /var/hvmail/control/postgres.conf file from a server that has 8GB of RAM, and is running only GreenArrow Engine and Studio:
shared_buffers = 2GB
effective_cache_size = 4GB
work_mem = 82MB
maintenance_work_mem = 164MB
Once you’re finished editing /var/hvmail/control/postgres.conf, restart PostgreSQL to apply changes by running the following command. Please note that this will cause between 15 seconds and a few minutes of downtime, so plan accordingly if your server is currently in production:
hvmail_postgres_manager restart
Once PostgreSQL has been restarted, you can verify that it’s running by visiting GreenArrow Studio’s web interface or running the command below, which should return the string PostgreSQL is online.
echo "select ('PostgreSQL is online')" | /var/hvmail/postgres/default/bin/psql -U greenarrow
One of the more common reasons for PostgreSQL not staying up is not being able to allocate enough memory. If this happens, then add or edit the kernel.shmmax and kernel.shmall sysctl parameters. This can be set the /etc/sysctl.conf file if you’re using RHEL, or the /etc/sysctl.d/greenarrow.conf file if you’re using Debian. Make sure kernel.shmmax (specified in in bytes) exceeds PostgreSQL’s shared_buffers setting.
To apply sysctl changes, run:
sysctl -p
Configure HTTPS (Strongly Recommended)
We recommend using HTTPS for two reasons:
- HTTPS protects your login credentials.
- HTTPS is important for open tracking because some browsers and webmail clients block HTTP open tracking URLs or rewrite them to HTTPS.
We recommend using GreenArrow’s automatic TLS certificate registration, which uses Let’s Encrypt.
If you don’t want to use Let’s Encrypt, then the TLS Certificate Configuration document describes the alternatives.
Here’s how to enable automatic TLS certificate registration:
-
Review the Let’s Encrypt subscriber agreement. Only proceed with step two if you accept the agreement.
-
Accept the agreement by adding the following to the end of the
/var/hvmail/control/greenarrow.conffile, and replacingREPLACEMEwith your email address. Keep the quotation marks:general { lets_encrypt_agree_to_terms_of_service yes lets_encrypt_registration_email "REPLACEME" } -
Apply changes by running
greenarrow config reload.If you did not perform the steps in the “Tune the operating system” section above, this command may produce warning messages like those shown below:
!!!!!!!!!!!!!!!!!!!!!!!!!!!!!!!!!!!!!!!!!!!!!!!!!!!!!!!!!!!!!!!!!!!!!!!!!!!!!!!!! WARNING: The configured value for vm.overcommit_memory is set to 0. This can lead to processes being improperly killed by the out-of-memory killer. In order for GreenArrow to function properly, please set this to 1. !!!!!!!!!!!!!!!!!!!!!!!!!!!!!!!!!!!!!!!!!!!!!!!!!!!!!!!!!!!!!!!!!!!!!!!!!!!!!!!!! !!!!!!!!!!!!!!!!!!!!!!!!!!!!!!!!!!!!!!!!!!!!!!!!!!!!!!!!!!!!!!!!!!!!!!!!!!!!!!!!! WARNING: The configured value for vm.overcommit_ratio is set to 50. This can lead to processes being improperly killed by the out-of-memory killer. In order for GreenArrow to function properly, please set this to at least 400. !!!!!!!!!!!!!!!!!!!!!!!!!!!!!!!!!!!!!!!!!!!!!!!!!!!!!!!!!!!!!!!!!!!!!!!!!!!!!!!!! -
If the DNS for the server name configured above is ready, the application should be available over HTTPS in about one minute. Visit that server name over HTTPS (see the next section) to verify that it’s working. If it’s not, then the greenarrow lets_encrypt_status command can help you diagnose the problem.
If you don’t configure TLS certificates we recommend:
-
Disable the default behavior of using HTTPS for URL Domains by adding the following to the
/var/hvmail/control/greenarrow.conffilegeneral { url_domains_always_use_tls no } -
Apply changes by running
greenarrow config reload.
Configure GreenArrow Engine Time Zone (Optional)
The engine_time_zone directive allows for specifying
a time zone for the GreenArrow Engine. If it’s not specified, a warning like the following will appear
whenever either the command greenarrow config reload or the command greenarrow config validate is
run:
!!!!!!!!!!!!!!!!!!!!!!!!!!!!!!!!!!!!!!!!!!!!!!!!!!!!!!!!!!!!!!!!!!!!!!!!!!!!!!!!!
WARNING: The directive engine_time_zone has not been configured, so GreenArrow
will default to using the system time zone (UTC).
!!!!!!!!!!!!!!!!!!!!!!!!!!!!!!!!!!!!!!!!!!!!!!!!!!!!!!!!!!!!!!!!!!!!!!!!!!!!!!!!!
greenarrow list_known_time_zones
Alternatively, the following command lists only United States time zones:
greenarrow list_known_time_zones --us-only
To set the time zone for GreenArrow to use, edit the /var/hvmail/control/greenarrow.conf file and add
the following line to the general context section:
general {
   engine_time_zone America/New_York
}
substituting your preferred time zone for America/New_York, and then run the commaned
greenarrow config reload
Server name (Required)
Configure the domain name of the server. This should be a fully qualified domain name with an A record pointing to this server. The default value is the server’s hostname.
Here’s an example of how to set the name to SERVER_NAME:
hvmail_set me SERVER_NAME
greenarrow service restart senders
More documentation on setting the server name can be found here.
Login URLs (Required)
You can connect to the web interface of GreenArrow at the server name configured above.
Engine’s web interface is accessed at the path /greenarrowadmin/ of GreenArrow’s HTTP or HTTPS server. For example, on a server named example.com running HTTPS service on the default ports, the web interface will be accessed at:
https://example.com/greenarrowadmin/
Studio’s web interface is accessible at the path /ga/ of GreenArrow’s HTTP or HTTPS server, so using the domain example.com as above, the login URL for GreenArrow Studio’s web interface will be:
https://example.com/ga/
Disable Studio services (Required for Engine-only customers)
Studio customers should skip this step.
If you’re not using Studio, then disable its services to conserve system resources:
svc -d /service/hvmail-{studio-worker,pure-ftpd,pure-authd-studio}
touch /service/hvmail-{studio-worker,pure-ftpd,pure-authd-studio}/down
Incoming email configuration (Required)
Create at least one incoming email domain using the Server Name, along with at least one bounce mailbox, and at least one spam complaint mailbox. These will be used by GreenArrow’s bounce processor and spam complaint processor.
We recommend having at leat one incoming email domain configured (using the Server name) with root, postmaster, and abuse email accounts or email forwarders. Any additional incoming email domains can be created using these steps, or they can be configured as aliased incoming email domains if they do not need to have a unique configuration.
Configure DKIM Signing for Outbound Mail (Required)
For each domain you plan to use as an RFC5322.From domain, configure DKIM signing for that domain by following these steps.
IP addresses for sending (Required)
At least one IP address is required for sending. This means that your GreenArrow Engine installation must at least have a default VirtualMTA
Follow the instructions in this documentation to set up your IP addresses, including your default VirtualMTA.
Create URL Domain(s) (Required)
GreenArrow Engine and Studio use URL domains for click and open tracking.
Create at least one URL domain using the instructions in the URL (Click and Open Tracking) Domains page.
Configure SimpleMH (Required)
There are two methods for injecting messages into GreenArrow Engine - SimpleMH and Raw Injection. SimpleMH is both easier to use and more feature-rich, and so we recommend using it exclusively unless there’s a need to use Raw Injection.
GreenArrow Engine’s SimpleMH system classifies mail into Mail Classes. Each message that’s processed by SimpleMH is assigned a Mail Class, which is used to determine which SimpleMH Mail Features to use.
-
Create a Mail Class named “default” using the Web Interface. This Mail Class is used for SimpleMH mail which does not have a Mail Class defined.
-
Either in the user interface or the configuration file, set the default URL domain.
-
Either in the user interface or the configuration file, set the default bounce mailbox.
-
Update the following line in the
/var/hvmail/control/simplemh-configconfiguration file:-
$CAMPAIGNID_PREFIX- this is the prefix used with GreenArrow Monitor. It needs to be a unique value to your server, and needs to follow the parameters listed in the Campaign ID documentation. If you’re unsure of what to use here, you can run this to get a unique ID and paste it into the config:cut -c1-30 /var/hvmail/control/me
-
Sendmail symlinks (Optional)
If you want the operating system to use GreenArrow for sending mail, then create the following symlinks:
ln -sf /var/hvmail/bin/sendmail /usr/sbin/sendmail
ln -sf /var/hvmail/bin/sendmail /usr/lib/sendmail
Grant SSH access to GreenArrow (Optional)
GreenArrow technicians may occasionally need to SSH into your server in order to fulfill support requests. See SSH Access for details on how to grant access.
GreenArrow Monitor integration (Optional)
If you have a GreenArrow Monitor account and would like to be able to view Monitor stats within Engine’s web interface, two configuration files should be created which store your Monitor account’s username and password. For example, if your username is username, and your password is password, these files would be created by running the following commands:
echo username > /var/hvmail/control/monitor.username
echo password > /var/hvmail/control/monitor.password
See the Installing and Updating your GreenArrow Monitor Seedlist document for information on how to add the GreenArrow Monitor seedlist into GreenArrow Engine or Studio.
Configure GreenArrow to Start at Boot Time (Strongly Recommended)
Run the following command to ensure that GreenArrow starts when the host boots:
systemctl enable greenarrow
Final Testing
-
Verify that some common misconfigurations are not present. Each test gets a simple pass/fail result:
hvmail_check_config -
Verify that all services are running normally. Any services with an abnormal state will be shown in red:
greenarrow service statusThe
hvmail-qmail-smtpd3andhvmail-dnscacheservices are down by default. All other services should be reported as up unless you shut them down intentionally. -
Send yourself a test email (replacing [email protected] with your actual email address):
date | /var/hvmail/bin/mailsubj "GreenArrow Test Message" [email protected]
Congratulations, you’re finished installing GreenArrow! As a next step, we recommend following up with GreenArrow technical support to schedule a training call.